Roles & Permissions
Control user access levels in Altostrat SDX using roles, which group granular permission scopes for accessing resources and performing actions via the UI and API.
Roles & Permissions in Altostrat SDX
Altostrat SDX uses a flexible Role-Based Access Control (RBAC) system to manage user capabilities. Permissions (also referred to as Scopes) define the ability to perform specific actions (like viewing billing info or deleting a site), while Roles group these permissions together. Roles are then assigned to users within the context of a specific Team, determining what each user can do within that team’s resources.Key Concepts
- Permissions (Scopes): Fine-grained strings representing specific actions, typically in the format
resource:action(e.g.,site:view,billing:update,api:create). These scopes directly control access to API endpoints and influence what is visible or actionable in the user interface. - Roles: Collections of permissions. Assigning a role to a user grants them all the permissions contained within that role for the team they are assigned to.
- System Roles: Predefined roles with common permission sets provided by Altostrat SDX (e.g., Owner, Administrator, potentially a read-only or member role). System roles usually cannot be deleted or fundamentally altered.
- Custom Roles: Roles you create and manage within your team, allowing you to tailor access precisely by selecting specific permissions.
- Team Context: Role assignments are specific to a Team. A user might be an Administrator in one team but only have view permissions in another.
Permission Scope Reference
Permissions grant access to specific functionalities. Here is a breakdown of common permission scopes grouped by area, based on available API actions:User & Authentication Management
User & Authentication Management
| Scope | Explanation |
|---|---|
user:view | View user details within the team. |
user:create | Create new users and add them to the team. |
user:update | Update user profile details and role assignments. |
user:delete | Remove users from the team/system (restrictions apply). |
| (Implied/OAuth) | Manage own 2FA settings (enable, disable, confirm, get codes). |
| (Implied/OAuth) | View own user info. |
Team Management
Team Management
| Scope | Explanation |
|---|---|
team:create | Create new teams within the organization. |
team:update | Update team details (name, site limit). |
team:delete | Delete teams (restrictions apply). |
teams:invite-users | Invite users to join a team; cancel invitations. |
teams:remove-users | Remove members from a team (cannot remove owner). |
| (Implied/Membership) | List teams, view team details, members, invites. |
| (Implied/Membership) | Switch active team context. |
Roles & API Credentials
Roles & API Credentials
| Scope | Explanation |
|---|---|
role:view | View available roles (system & custom) and assigned scopes. |
role:create | Create new custom roles for the team. |
role:update | Update custom team roles (name, assigned scopes). |
role:delete | Delete custom team roles (if unassigned). |
api:view | View team API credentials (names, IDs, usage). |
api:create | Create new API credentials for the team. |
api:update | Update API credential details (name, expiry). |
api:delete | Delete/revoke API credentials for the team. |
| (Implied/Auth) | List all available permission scopes. |
Billing Management
Billing Management
| Scope | Explanation |
|---|---|
billing:view | View billing account details, payment methods, tax IDs, invoices, subscription overview, |
| pricing, upcoming invoice, supported Tax ID types. | |
billing:update | Update billing account, manage payment methods (add, set default, delete), manage tax IDs |
| (add, delete), manage subscriptions (create, update quantity/interval, cancel). |
Site & Device Management (SDX / SPA API)
Site & Device Management (SDX / SPA API)
| Scope | Explanation |
|---|---|
site:view | View site details, list sites, view uptime, versions, recent sites. |
site:create | (Primarily internal/adoption flow) Create site records. |
site:update | Update site details (name, address, timezone etc). |
site:delete | Mark a site for deletion. |
site:action | Perform specific actions on a site (e.g., reboot). |
job:view | View job history and details for a site. |
job:create | Create asynchronous jobs (scripts/commands) for a site. |
job:delete | Delete pending jobs for a site. |
backup:view | List backups, view backup content, view diffs, view subnets. |
backup:create | Request a new backup to be taken for a site. |
inventory:view | View network inventory like ARP tables, syslog, possibly interfaces. |
inventory:update | Update metadata associated with inventory items (e.g., ARP alias). |
logs:view | View system log events from CloudWatch. |
script:create | Create scheduled scripts, generate scripts via AI. |
script:view | View scheduled scripts and execution progress. |
script:update | Update scheduled scripts, request authorization. |
script:delete | Delete or cancel scheduled scripts. |
script:run | Immediately run or test a scheduled script. |
script:authorize | Authorize a scheduled script for execution. |
| (Implied/UI) | List community scripts and view their details. |
Networking Services (VPN, WAN, Elastic IP, CPF)
Networking Services (VPN, WAN, Elastic IP, CPF)
| Scope | Explanation |
|---|---|
vpn:view | View VPN instances and peers. |
vpn:create | Create VPN instances and peers. |
vpn:update | Update VPN instances and peers. |
vpn:delete | Delete VPN instances and peers. |
wan:view | View WAN failover configurations and tunnels. |
wan:create | Create WAN failover services and tunnels. |
wan:update | Update WAN failover tunnels and priorities. |
wan:delete | Delete WAN failover services and tunnels. |
elasticip:view | List assigned Elastic IPs and managed subnets. |
elasticip:create | Assign new Elastic IPs. |
elasticip:update | Reset RADIUS password, update PTR records. |
elasticip:delete | Release assigned Elastic IPs. |
cpf:view | List Control Plane policies. |
cpf:create | Create Control Plane policies. |
cpf:update | Update Control Plane policies, assign sites. |
cpf:delete | Delete Control Plane policies. |
apicredentials:view | View site API credentials (CPF). |
apicredentials:create | Rotate/create site API credentials (CPF). |
transientaccess:view | View transient access sessions. |
transientaccess:create | Create transient access sessions (Winbox/SSH). |
transientaccess:delete | Revoke transient access sessions. |
transientforward:view | View transient port forwards. |
transientforward:create | Create transient port forwards. |
transientforward:delete | Revoke transient port forwards. |
Security Services (Content Filter, Threat Feeds, CVE)
Security Services (Content Filter, Threat Feeds, CVE)
| Scope | Explanation |
|---|---|
contentfilter:view | View DNS & BGP/DNR policies, categories, apps, assigned sites/tunnels. |
contentfilter:create | Create DNS & BGP/DNR policies. |
contentfilter:update | Update DNS & BGP/DNR policies, assign/unassign from sites/tunnels. |
contentfilter:delete | Delete DNS & BGP/DNR policies (if unassigned). |
cve:view | View CVE scan schedules and scan results. |
cve:create | Create new CVE scan schedules. |
cve:update | Update CVE scan schedules, start/stop scans manually. |
cve:delete | Delete CVE scan schedules. |
Reporting & Notifications
Reporting & Notifications
| Scope | Explanation |
|---|---|
sla:view | View SLA report schedules. |
sla:create | Create new SLA report schedules. |
sla:update | Update SLA report schedules. |
sla:delete | Delete SLA report schedules. |
sla:run | Manually run SLA reports, view/delete generated reports. |
notification:view | View notification groups. |
notification:create | Create notification groups. |
notification:update | Update notification groups. |
notification:delete | Delete notification groups. |
webhook:test | Test webhook integrations (Slack, Teams). |
fault:view | View fault history and details. |
fault:create | (Implied) Generate fault tokens (might require view or specific create). |
Creating a Role
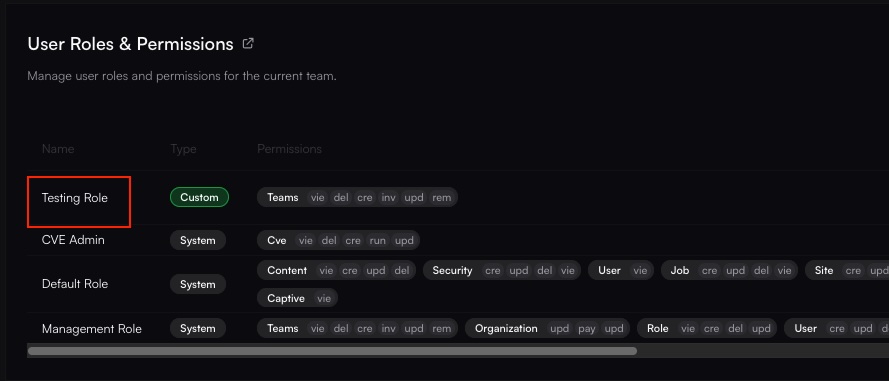
Follow these steps to create a custom role within your currently active team:Navigate to Roles & Permissions
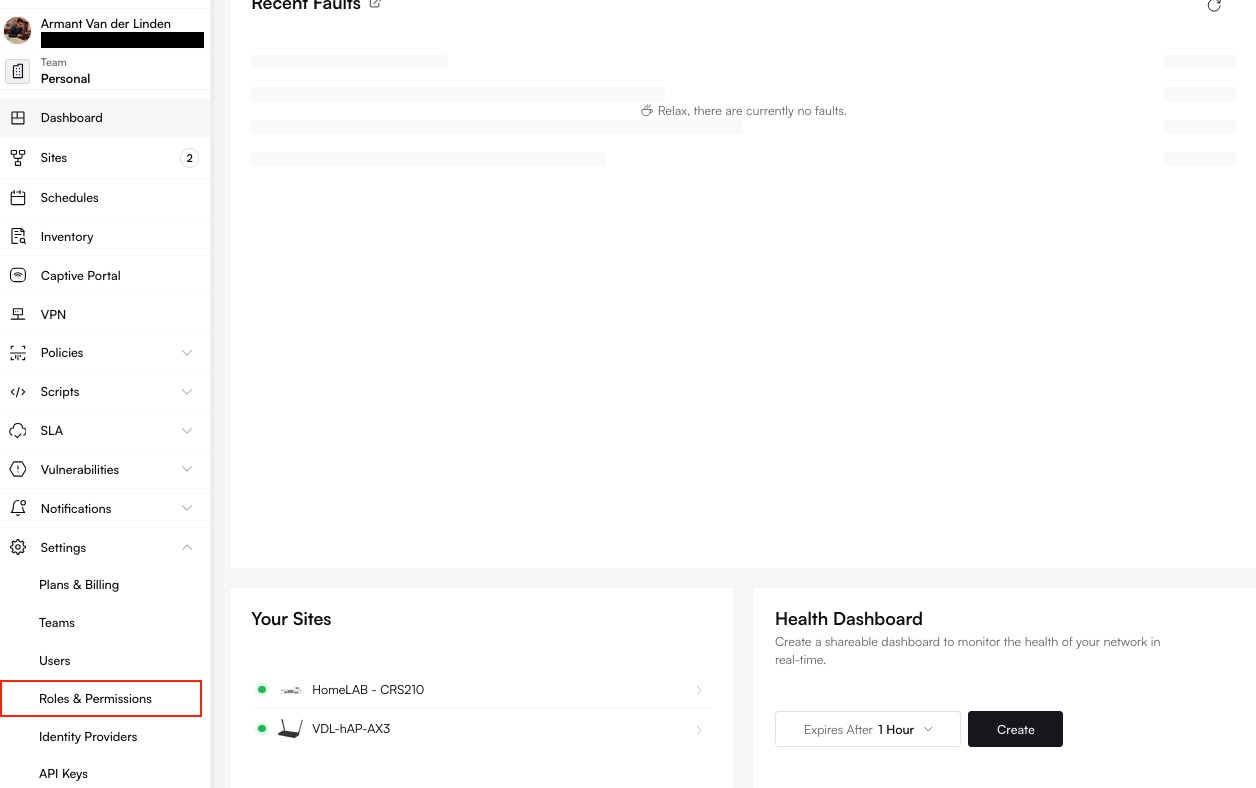
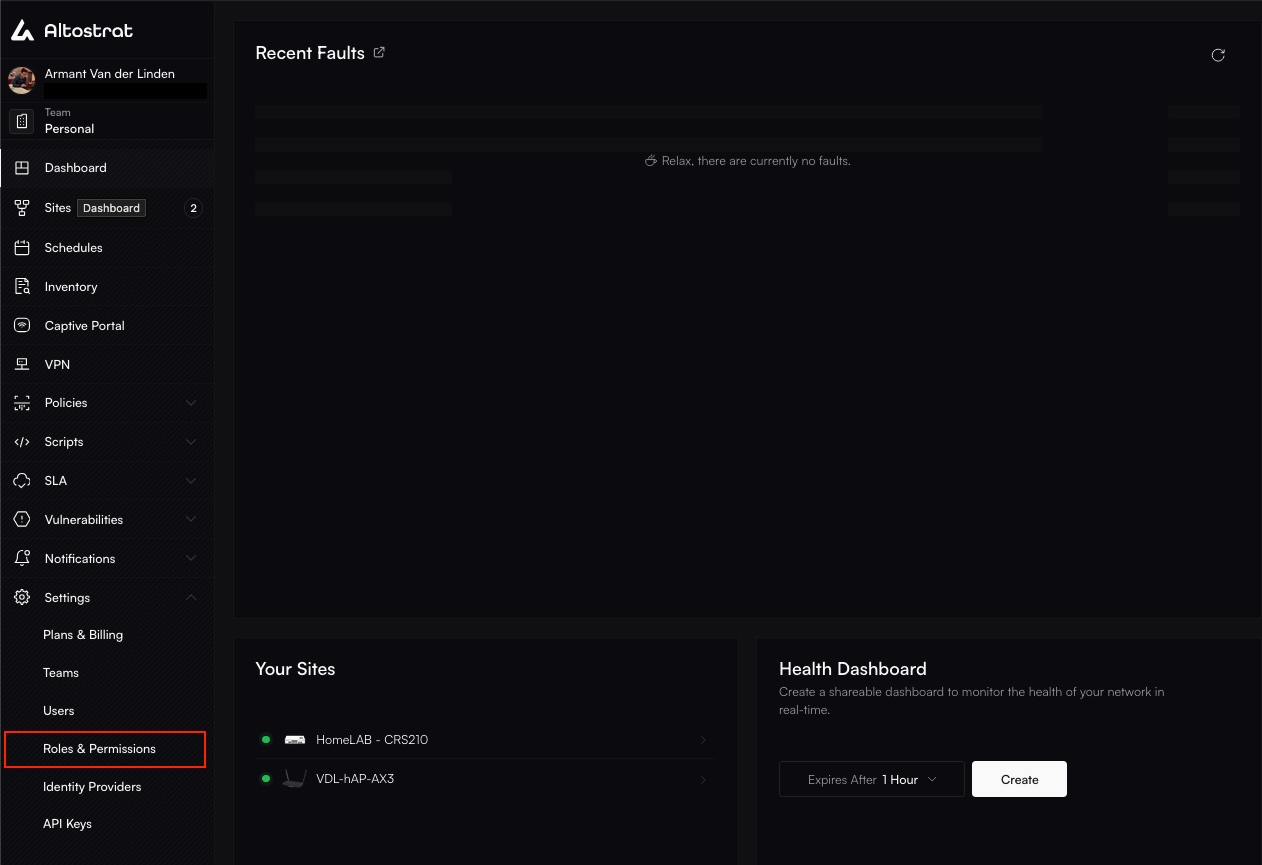
Roles & Permissions main view listing existing roles.
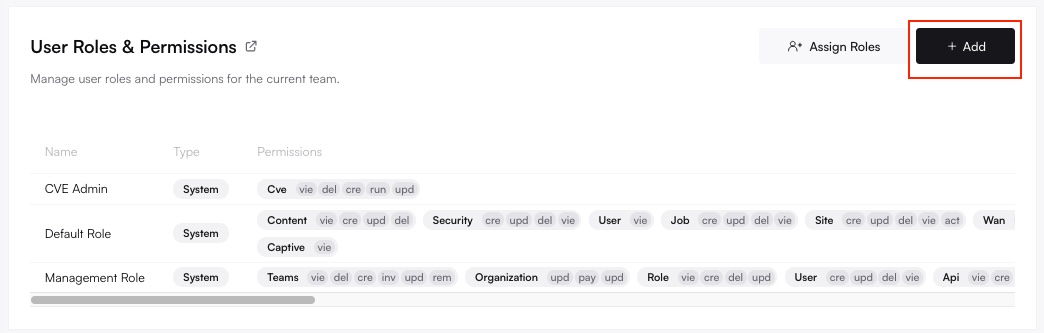
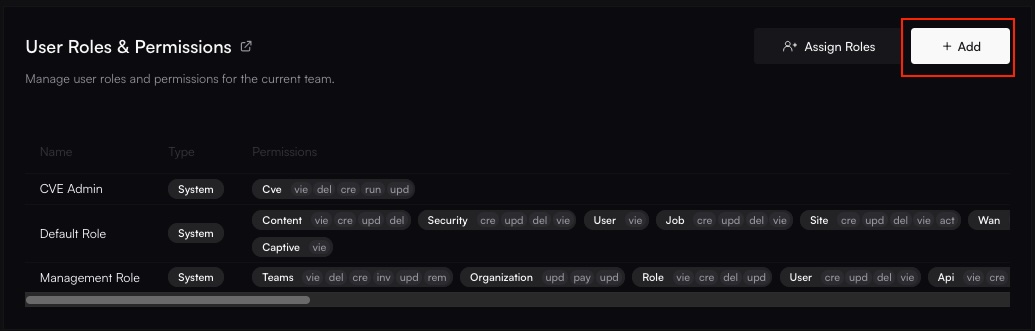
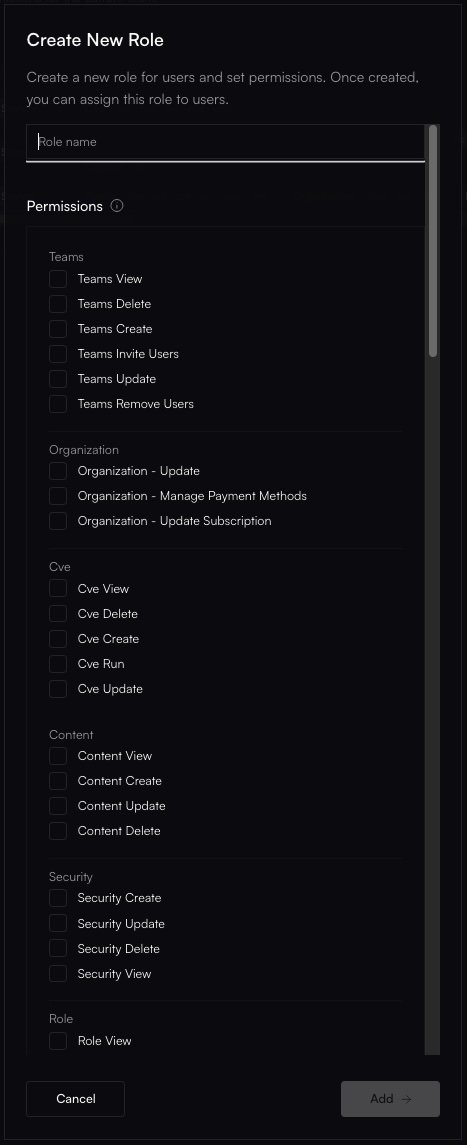
Start Creating a New Role
Entering the name for the new custom role.
Assign Permissions (Scopes)
site:view, billing:update) you want to grant to this role.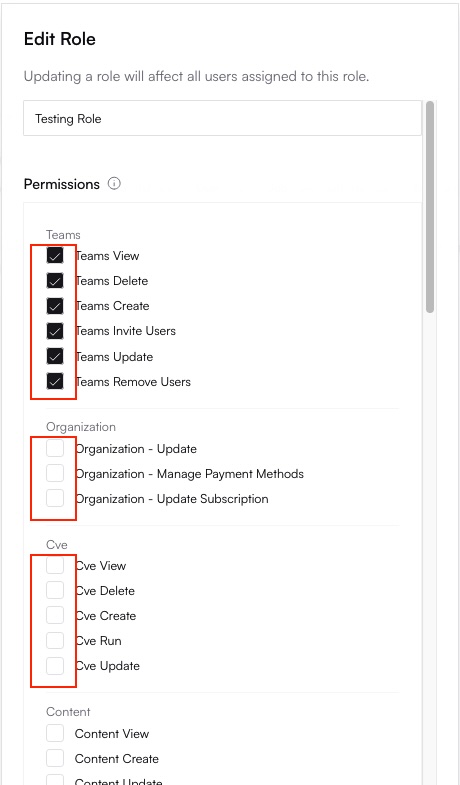
Selecting specific permission scopes like 'site:view' and 'billing:view'.
Save the Role
POST /team_roles API call).
The newly created role saved and appearing in the list.
Editing a Role
You can modify the name and assigned permissions of custom roles. System roles typically cannot be edited.Select the Role to Edit

Clicking on the 'NOC Ops' role to edit its permissions.
Modify Name or Permissions
Adding the 'site:action' scope and removing 'team:delete' scope from the role.
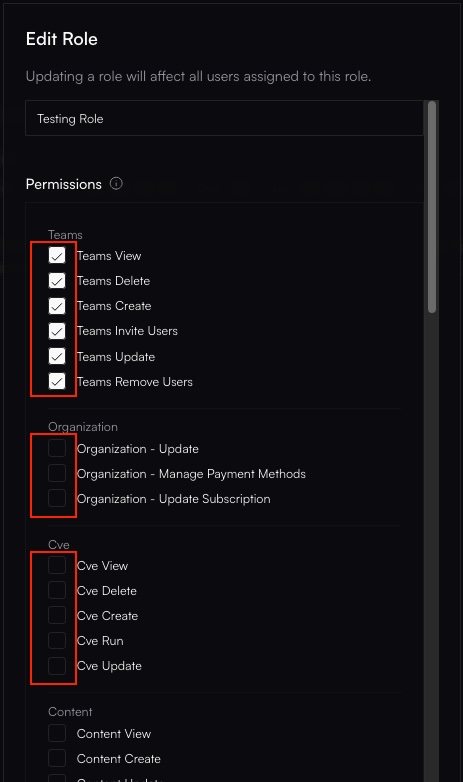
Save Changes
PUT /team_roles/
API call). Users might need to refresh their session (e.g., log out and back in) for changes to take full
effect.
Saving the updated role permissions.
Deleting a Role
You can only delete custom roles. Deleting a role cannot be undone.Locate the Custom Role
Identifying the custom role 'Temporary Access' to be deleted.
Locating the delete icon (trash can or menu) next to the custom role.
Confirm Deletion
DELETE
/team_roles/ API call).Clicking the delete icon and confirming the removal of the role.
Assigning Roles to Users
Roles are assigned to users within the Team Members management section.- Navigate to Team Settings -> Members.
- Select the user whose roles you want to manage within the current team.
- Assign one or more available roles (system or custom) to the user.
- Save the changes.
Best Practices
- Use System Roles First: Leverage predefined roles like Administrator or Member for common access patterns before creating custom ones.
- Principle of Least Privilege: Grant only the necessary permissions (scopes) required for a user to perform their job function within a team. Avoid overly broad roles.
- Create Task-Specific Custom Roles: Define roles based on responsibilities (e.g., “Billing Viewer,” “Site Operator,” “Security Auditor”) rather than individual users.
- Regular Audits: Periodically review role definitions and user assignments to ensure they are still appropriate and align with current responsibilities and security policies.
- Document Custom Roles: Clearly document the purpose and intended permissions of each custom role you create for your team’s reference.