Getting Started
Initial Configuration
Prepare your MikroTik device with a clean configuration and updated firmware before integrating it with Altostrat SDX.
This page guides you through the recommended initial setup for your MikroTik device before you integrate it with the Altostrat SDX platform. Performing these steps ensures your router is in a known, clean state with basic connectivity and up-to-date firmware, facilitating a smoother onboarding process to access Altostrat’s services.
The key preparation steps include:
 Option B: Reset via Winbox or CLI
Your MikroTik router should now be reset, online, and updated, making it ready for the next step: onboarding it onto the Altostrat SDX platform. Proceed to Adding a Router to integrate your prepared device with Altostrat SDX.
- Resetting the device to clear previous configurations.
- Establishing a basic internet connection.
- Upgrading the RouterOS firmware to the latest stable version.
Preparing Your MikroTik Router
Follow these procedures to prepare your device:1. Verify Power and Boot Completion
- Power On: Plug in your MikroTik router and allow 10–60 seconds for it to fully boot.
- Check Indicators: Confirm the device is operational via its LCD panel, status LEDs, or boot completion sounds.
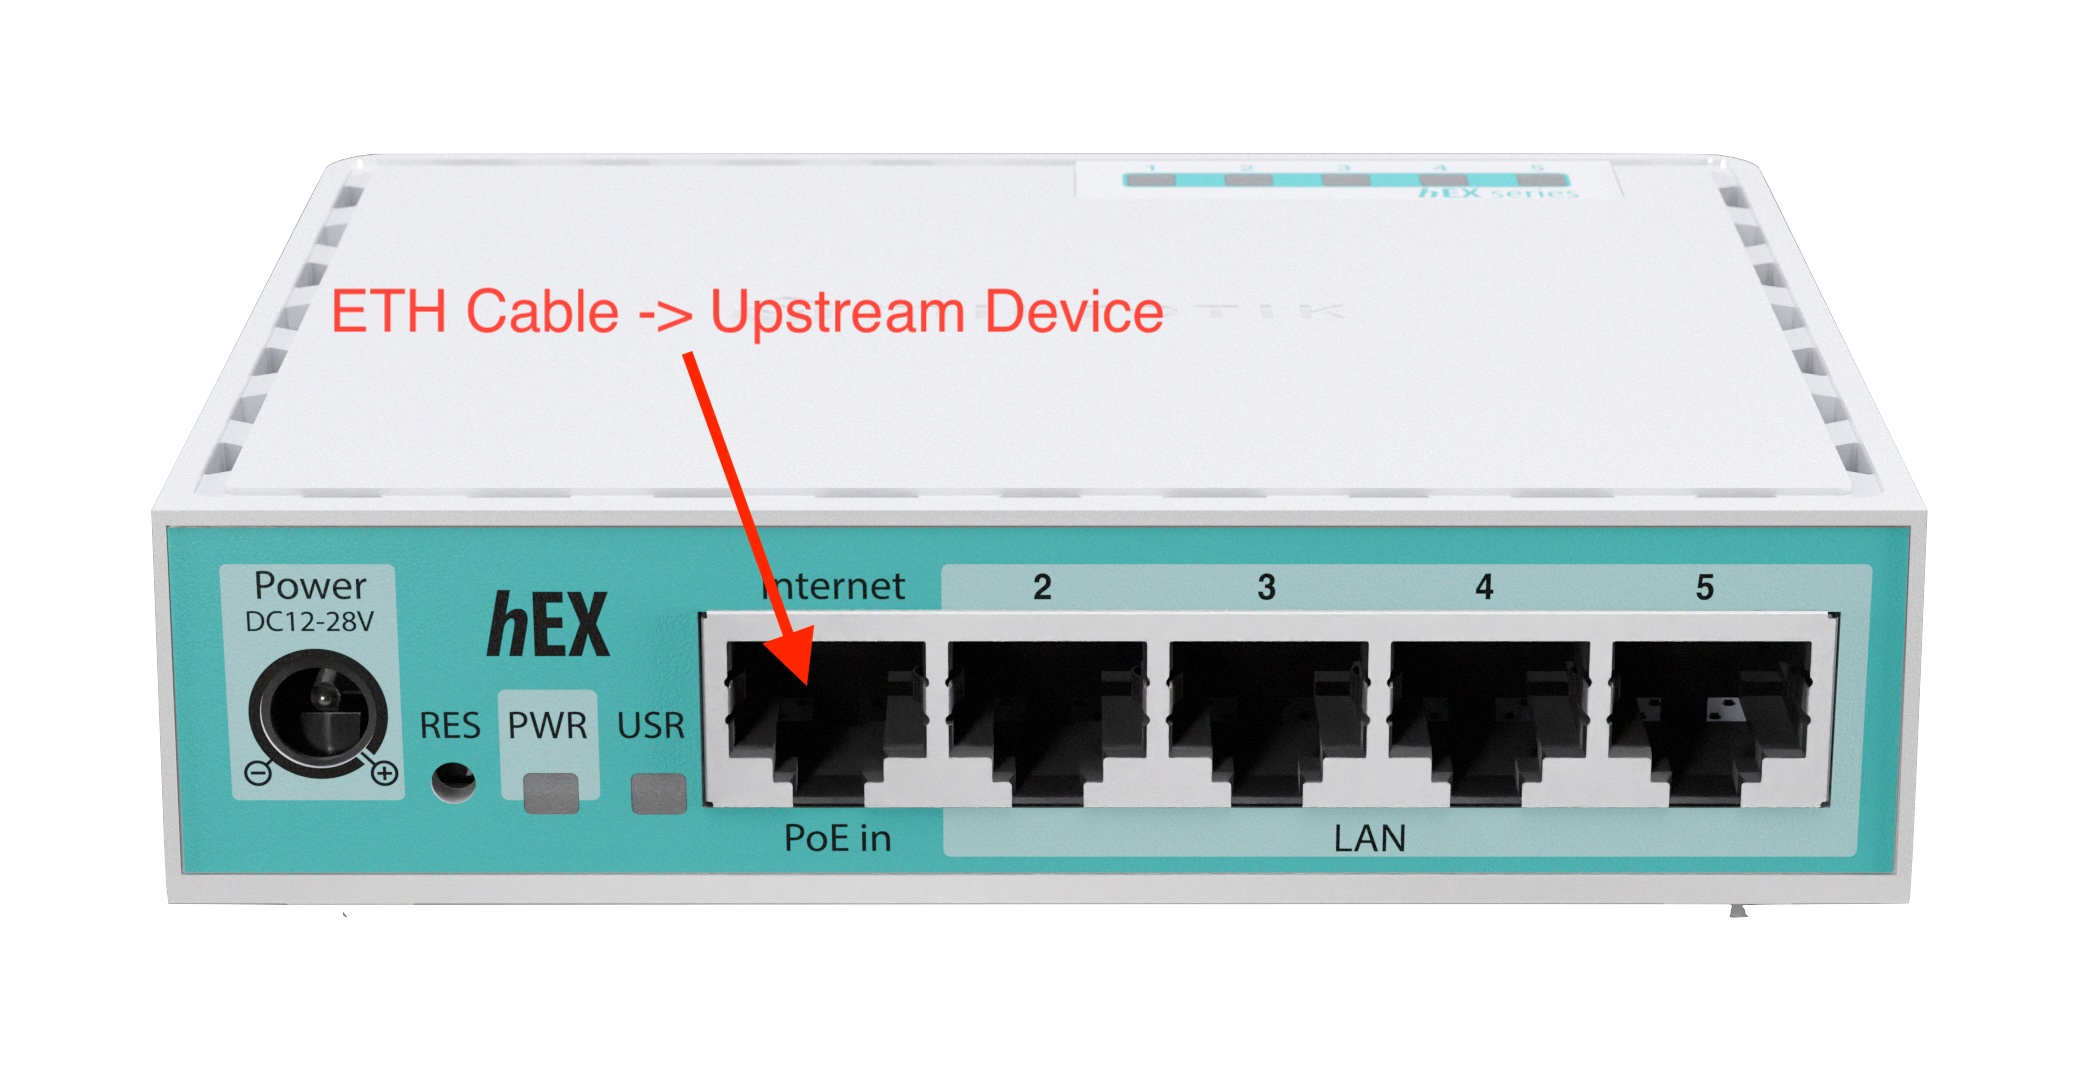
2. Physically Connect for Internet Access
- WAN Connection: Connect an Ethernet cable from your upstream internet source (e.g., modem, switch) to the ether1 port (or designated WAN port) on your MikroTik router.
- Device Connection Port:
For detailed first-time connection guidance, refer to MikroTik’s official documentation:
https://help.mikrotik.com/docs/spaces/ROS/pages/328151/First+Time+Configuration
3. Reset RouterOS to Factory Default Settings
Starting with a clean configuration is highly recommended for predictable integration. Choose one method: Option A: Reset via LCD Panel (if available)- Navigate the LCD menu to find Factory Reset (or similar).
- Confirm the reset, potentially entering the default PIN
1234if prompted.
The device will reboot. After reboot, it typically uses the default IP 192.168.88.1 for management access.
- Connect to the router using Winbox (Download from MikroTik) or SSH.
- In Winbox, go to System → Reset Configuration. Crucially, check the box for No Default Configuration and click Reset Configuration.
- Alternatively, in the CLI, run the command:
/system reset-configuration no-defaults=yes skip-backup=yes
Using
no-defaults=yes ensures the router starts completely blank, avoiding potential conflicts with Altostrat’s
configuration pushes during onboarding.4. Establish Basic Internet Connectivity
Ensure the router can reach the internet. This is necessary for firmware updates and communication with Altostrat SDX.- Using DHCP Client on WAN (ether1): (Most common method if your upstream network provides DHCP)
- In Winbox: Go to IP → DHCP Client.
- Click Add New (+).
- Set Interface to
ether1(or your designated WAN port). - Ensure Use Peer DNS and Add Default Route are enabled (these are usually the defaults).
- Click Apply/OK. Verify the status shows “bound” and that the router receives a valid IP address.
- Using Static IP or PPPoE: Configure IP → Addresses and IP → Routes (for static) or configure the PPP interface settings (for PPPoE) according to your Internet Service Provider’s instructions.
- Open a New Terminal in Winbox or use the CLI.
- Run a ping test:
- Successful replies (0% packet loss) indicate the router is online. If pings fail, double-check your WAN configuration (IP address, subnet mask, gateway, DNS servers).
5. Update RouterOS Firmware
Running the latest stable firmware ensures compatibility, security, and access to the latest features needed for Altostrat SDX.- In Winbox, go to System → Packages.
- Click the Check For Updates button.
- In the window that appears, select the stable channel from the Channel dropdown menu.
- Click Check For Updates again.
- Compare the Installed Version shown with the Latest Version. If they are different, click the Download&Install button.
The router will reboot automatically after downloading and installing the firmware update. You will need to reconnect to Winbox/CLI after the reboot.
- Check RouterBOARD Firmware: After the RouterOS update and reboot, it’s good practice to go to System → RouterBOARD in Winbox. Check if the Current Firmware differs from the Upgrade Firmware. If an upgrade is available and recommended, click the Upgrade button and reboot the router once more when prompted.
For more details on RouterOS upgrades, see MikroTik’s documentation: https://help.mikrotik.com/docs/display/ROS/Upgrading+and+installation
Your MikroTik router should now be reset, online, and updated, making it ready for the next step: onboarding it onto the Altostrat SDX platform. Proceed to Adding a Router to integrate your prepared device with Altostrat SDX.